Removing a bad patch using Microsoft Windows Server Update Service
This tip offers information about how to remove a bad software patch using Microsoft Microsoft Windows Server Update Service.

Microsoft’s primary tool for deploying updates is the Windows Server Update Service (WSUS). What some administrators don’t realize is that WSUS can also remove buggy patches from client computers (assuming that WSUS was used to deploy the update).
If you have never noticed a “Remove” button in WSUS, it’s possibly because WSUS’ patch removal process is a little bit counter-intuitive. Before you can remove a patch, you must first approve a patch for removal. To do so, open the “Update Services” console and expand the “Updates” container. Select the sub-container containing the update and then locate the patch that you want to remove.
Now, right-click the patch that you want to approve for removal and choose the “Approve” option from the resulting shortcut menu. This will cause WSUS to display the “Approve Updates” dialog box. Then right click on the computer group from which you want to remove the patch and then choose the “Approve for Removal” option from the resulting dialog box.
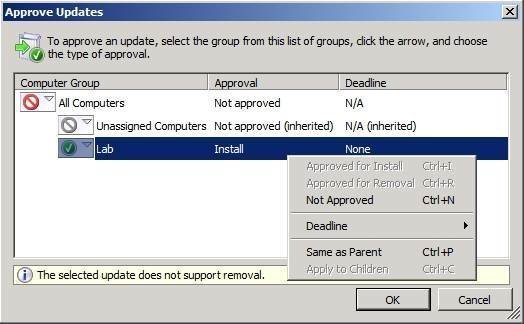
Before I move on, there is one important thing that I want to point out about the technique that I just described. If you look at Figure A, you will notice that the “Approve for Removal” option is grayed out. The reason for this is that some patches cannot be removed once they have been installed (there is a workaround described below). If you look at the bottom of the dialog box shown in the figure, you can see that WSUS actually tells you that the selected update does not support removal.
Some patches cannot be removed.
Expediting the removal process
If you decide to remove a patch, you will want the patch to be removed quickly. Thankfully, Windows Server Update Service provides a way to expedite this process.
If you look back at Figure A, you will notice a “Deadline” option on the shortcut menu. If this particular patch supported removal, the “Deadline” option could be used to specify how quickly the patch should be removed. When you click on the “Deadline” option you are presented with options such as One Week, Two Weeks, etc., but there is also an option to set a custom deadline. If you want the patch to be removed quickly, you can create a custom deadline and specify a date that is in the past.
Manually removing a patch
If you are not able to use Windows Server Update Service to remove a patch, most patches can be manually removed from severs or workstations on which they were deployed. The exact method of removing an unwanted patch varies depending on the operating system that is being used.

You can manually remove an unwanted patch from a server running Windows Server 2008 R2 by opening the Control Panel, clicking on “Uninstall a Program,” clicking on “View Installed Updates”, selecting the update that you want to remove, and then clicking the “Uninstall” button. You can see what this looks like in Figure B.
You can manually remove a patch from a server.
If you decide to remove a patch in this way, be sure to configure WSUS (or any other patching solution that you might be using) not to distribute the patch. Otherwise, the patch might be automatically reinstalled.
System rollback
As you saw earlier, some patches do not support removal. If you need to remove such a patch from a server, you will probably have to restore from a backup. However, if you need to remove a patch from a workstation running Windows 7 and the patch can’t be removed through the normal means then you might be able to remove the patch by using the System Protection feature.
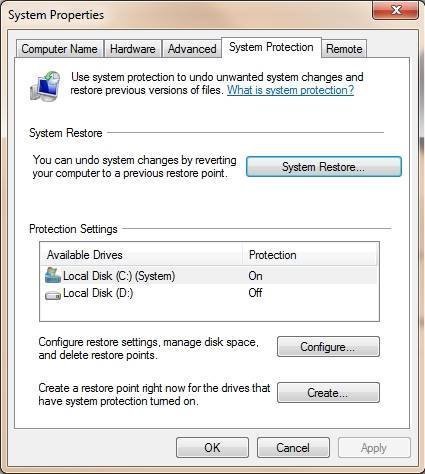
System Protection is an option that allows a computer to be reverted to an earlier point in time by rolling back changes that have occurred. You can access this feature by clicking the “Start” button, right-clicking on the “Computer” menu option, and then choosing the “Properties” command from the shortcut menu. Doing so reveals the System Properties sheet. Now just click on the “System Protection” link to access the System Protection feature, as shown in Figure C.
The System Protection feature allows you to roll a Windows 7 PC back to an earlier point in time. From this point, you can simply click the “System Restore” button and then use the System Restore Wizard to select a recovery point to restore, as shown in Figure D.
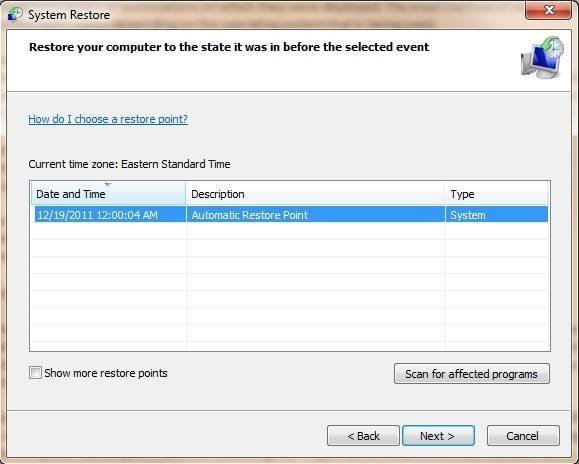
Choose the restore point that you want to recover.
Conclusion
As you can see, there are several different options for removing buggy patches. Even so, it is better to thoroughly test patches before you deploy them than to try to remove buggy patches later on.